Positive Pay layouts [in-depth guide]

Guide contents: Layout editor | Sending Positive Pay from the Payment screen | Example of the outputted File | Resources
Check printing interface & Positive Pay layouts
To use Positive Pay, you create a layout that matches your bank's layout. Workamajig uses a flexible layout screen to define fields and set up the file. If you click the Copy layout from button, you can copy the layout from some of the larger banks' predefined layouts. To generate a positive pay file, you can either do it at time of printing checks or in larger batches from the Payments screen.
What is a Positive Pay system?
Positive Pay systems are a powerful tool for fighting check fraud. As the incidences of counterfeit checks continues to increase, more and more financial institutions are employing such tools to help reduce their losses. In essence, a positive pay system allows a bank to compare checks presented against its commercial customer's account against items the customer indicates it has written. It will uncover instances where the amount has been altered, a counterfeit has been created using a different check number, or the payee name does not match.
Layout editor
Positive Pay layouts may be accessed from Menu > Admin/manager > System setup > GL settings> Positive Pay layouts. Positive Pay information is transmitted to banks in a fixed-width, plain text format known as a "flat file." A bank that accepts Positive Pay data will publish a document specifying the format to use. That document may be used to create an appropriate layout, or a pre-defined layout may be used or modified.
Copy layout from
We have defaults in place for BMO or BofA. To use one of these, create a new layout and name it. Then use Copy layout from option to copy in these defaults.
Manually creating a layout
- In a fixed-width file, each line of data represents a new record and each field of data is a predetermined number of characters. A file of names that had two fields, an 8-character first name field, and an 8 character last name field would look like this:
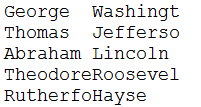
- Names (e.g. "George") that are fewer than 8 characters still take up 8 spaces. Names over 8 characters (e.g. "Rutherford") are truncated.
- When creating a Positive Pay layout, a unique 'layout name' is required to identify this layout in the areas of Workamajig it will be used. Typically, there will only be one layout per banking institution and the name could reflect this.
- Workamajig has preloaded some Positive Pay formats. To use one of these, click the Copy layout from... option in the upper right portion of the screen. This will overwrite any field information that has been input into the layout.
- There are three field sets, Header Fields, Detail Fields, and Footer Fields. Not all layout specifications use the header or footer fieldsets. All use the detail fields, as each check is represented as a detail record.
- If not loaded by using the Copy layout from... feature, each fixed-width column is added (or removed) using the Add and Remove buttons on the left side of the screen.
- Field label is required in order to refer to the data column (e.g. "Last Name").
- Start character index is a required numeric value specifying where the data field begins. In the above example, the last name field would have a start character index of "9".
- End character index is a required numeric value specifying where the data field ends. In the above example, the last name field would have an end character index of "16".
- Use payment data may be checked in order to specify information from the payment record in the data value field. Otherwise, information in the data value field will be printed as shown on each record.
- When Override on void is checked, voided payments will use the information in the void override value field instead of the data value field.
- The Placeholder character takes up empty data spaces. By default, when the data in a field contains fewer characters than the field definition, spaces are added. In the above example, there are two spaces after the name "George" because the field has 8 characters, and "George" only requires 6. If the Placeholder is defined as "*" for the first name the data would then print as "George**".
- Check the Required box if this data is required by the banking institution. This ensures that an error will be issued if this report is run with required data missing from the payment record rather than transmitting improper data to the banking institution. This is only relevant for fields that have 'use payment data' checked.
- The Format value specifies how payment data will be formatted in the report. Layouts will typically need date values, for instance, to be formatted uniformly to be interpreted correctly.
- Alignment is set to "Left" by default. This puts the placeholder character(s) to the right of the data. Some data, typically numeric data, is required to be preceded by the placeholder(s).
- The Grouping function is found only in the header & footer fields sets. This is most often used to "Sum" the payment amount for all detail records. It may also be set to "Count" to reflect the total number of payment records in the detail set.
Set new layout on check format
Once the new layout is created, it must be selected on the check format used for the normal printed check workflow. This allows the system to connect the selected bank account being used for payments with the print check format and the Positive Pay layout.
Menu > Admin/manager > System setup > GL settings > Check formats
Open the check format > select Positive Pay layout from dropdown list > SAVE
Sending Positive Pay from the Payments view
The payments view can be found in Purchasing today > Views > Payments.
Use the filters and then check the box next to the payments you want to generate a file for.
To be effective for printing voids, a filter should be added to this listing view for 'voided payment'. When set to yes, the listing will be restricted to only those payments with a corresponding void reversal line.
Payments that are to be included in the flat file should be selected. Selecting the Download Positive Pay file button will prompt for the layout to be used if there is more than one. Otherwise, the file is generated immediately.
Example of the outputted file
Resources
- create ACH files for upload [in-depth guide]
- Purchasing > Today purchasing page [guide]
- Select invoices to pay [in-depth guide]
- Print checks [in-depth guide]